
How to personalize your home with art for vibrant style
Blank walls are one of the most common and quietly frustrating features of any home. You move in, hang a clock, maybe a mirror, and suddenly a year passes with nothing that actually says you. Studies show that visual elements in living spaces directly influence mood, stress levels, and overall well-being. The good news is that personalizing your home with wall art doesn’t require an interior design degree or a massive budget. This guide walks you through everything from picking the right style to hanging your first piece, and keeping your space feeling fresh, personal, and alive.
Table of Contents
- Choosing the right art for your space
- Gathering materials and planning your layout
- Step-by-step guide to hanging your art
- Personalizing and refreshing your art displays
- Why personalization matters more than perfect design
Key Takeaways
| Point | Details |
|---|---|
| Choose art by room | Select art based on the room’s mood and function for the most harmonious results. |
| Plan before hanging | Careful layout and tool selection prevent mistakes and make installation easier. |
| Mix styles and media | Combining different art styles and materials adds character and depth to your home. |
| Refresh displays regularly | Rotating and updating art keeps your living space feeling unique and vibrant. |
| Embrace personal expression | Prioritize your tastes and memories over traditional design rules when choosing wall art. |
Choosing the right art for your space
Now that you see the impact personalized art can make, let’s start by finding the right kind of art for your unique space.
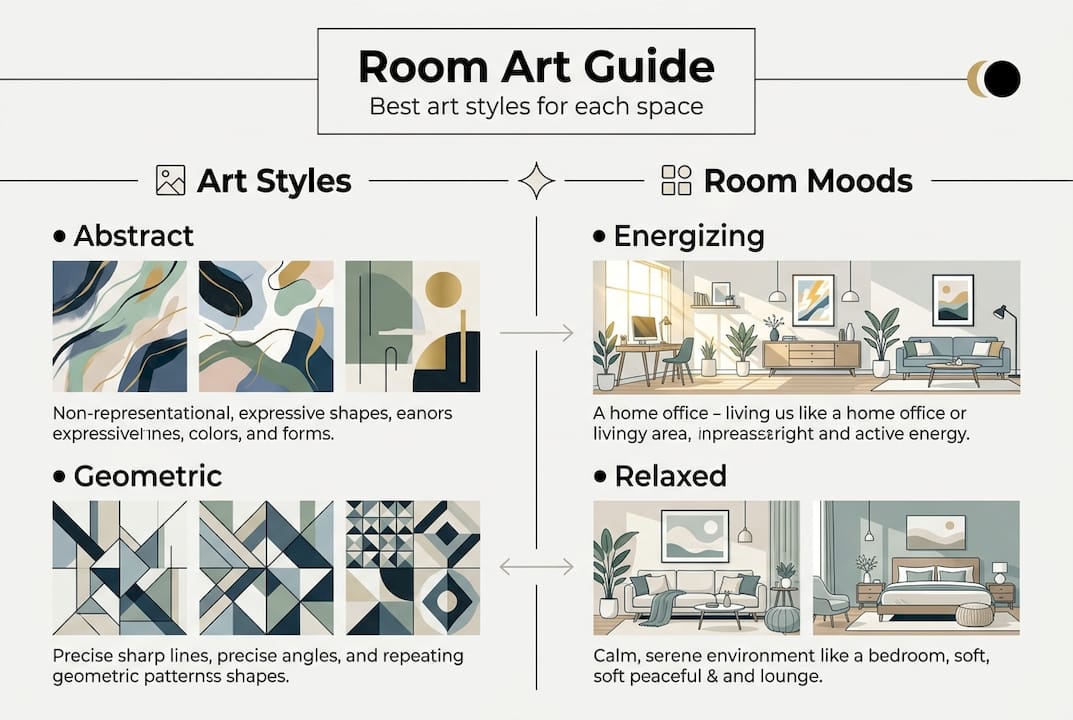
The first thing to recognize is that art styles serve very different emotional purposes. Abstract art creates energy and movement, making it perfect for living rooms and home offices where you want stimulation and creativity. Modern geometric art brings structure and calm, lending itself well to bedrooms or reading nooks. Photographic prints can ground a room with realism, while illustrative or painterly styles add warmth and narrative depth. Knowing this helps you choose art that actually works with your room, not against it.
Room function matters enormously when selecting art. A bedroom should feel like a retreat, so softer palettes and flowing, organic shapes tend to work best. A dining room or kitchen can handle bolder, more graphic pieces since you’re rarely trying to wind down there. A home office benefits from inspiring, thought-provoking imagery that keeps you motivated without being distracting.
Here’s a quick overview of how art styles match up to room moods:
| Art style | Best room | Mood effect |
|---|---|---|
| Abstract | Living room | Energizing, conversational |
| Geometric modern | Bedroom | Calm, structured |
| Floral or organic | Dining room | Warm, inviting |
| Photographic | Office or hallway | Grounded, realistic |
| Weave or cyclone | Any room | Dynamic, textural |
Size and placement are just as important as style. A small print on a large wall can feel lost, while an oversized piece in a narrow hallway feels cramped. As a general rule, your art should cover roughly 60 to 75 percent of the wall space above furniture. You can find canvas art for any room that’s scaled specifically to complement different spaces.
When it comes to matching colors, you don’t need an exact match to your sofa or curtains. Instead, pull one or two accent colors from your existing decor and look for art that incorporates them as secondary tones. This creates harmony without looking like a furniture showroom. Browsing a curated wall art collection by color palette can speed up this process considerably.
- Choose art that fits the emotional function of the room
- Scale your piece to the wall and nearby furniture
- Pull accent colors rather than trying to match exactly
- Mix styles only when one piece serves as the anchor
Pro Tip: Before buying, photograph your wall and use a free room visualization app to see how a piece looks at scale in your actual space.
Gathering materials and planning your layout
Once you’ve picked your art, it’s time to prepare for display by gathering materials and planning your approach.
Having the right tools on hand before you start saves a huge amount of frustration. There’s nothing worse than realizing mid-hang that you’re missing a level or the right hook size. Here’s what you’ll want ready:
- Tape measure
- Pencil and painter’s tape
- Level (even a small bubble level works)
- Hammer and nails or picture rail hooks
- Picture hanging strips or adhesive mounts
- Stud finder (especially for heavier pieces)
One of the biggest decisions is whether to use adhesive strips or traditional hardware mounting. Each has real trade-offs depending on your wall type and art weight.
| Method | Pros | Cons |
|---|---|---|
| Adhesive strips | No holes, renter-friendly | Weight limits, may fail in humidity |
| Nail and hook | Very secure, handles heavier art | Leaves holes, harder to adjust |
| Picture rail hooks | Flexible, no damage to walls | Only works with picture rails |
| Toggle bolts | Excellent for heavy pieces | Requires drilling, more permanent |
For renters especially, adhesive options have improved dramatically. Many brands now support up to 16 pounds per strip, which covers most standard canvas prints. Check out creative wall hanging tips for ideas on making adhesive mounting look intentional and stylish.
Before a single nail goes in, plan your layout on the floor. Arrange your pieces on the ground to see how they interact. You can also trace each piece on kraft paper, cut out the templates, and tape them to the wall with painter’s tape to preview the arrangement without commitment. This step is especially valuable for gallery walls.

For wall decor for home gallery arrangements, keep spacing consistent. A 2 to 3 inch gap between pieces usually looks intentional and balanced without feeling cramped.
Pro Tip: Try grouping three to five pieces at varying heights for a gallery wall effect. Odd numbers tend to feel more dynamic and visually interesting than even groupings.
Common mistakes include skipping measurements entirely and trusting your eye, which almost always leads to crooked results. Also watch out for ignoring natural light. Art placed in direct sunlight fades faster and can create glare that makes the piece hard to appreciate.
Step-by-step guide to hanging your art
With your tools ready and layout planned, follow this step-by-step guide to hang your art like a pro.
- Clean and prep your wall. Wipe down the surface with a slightly damp cloth to remove dust. This matters especially if you’re using adhesive strips, since they bond far better to a clean surface.
- Mark your anchor point. Measure the height you want the center of the art to sit (typically 57 to 60 inches from the floor, which is eye level for most people). Mark lightly with a pencil.
- Locate studs if needed. For heavier pieces like metal wall art ideas, always use a stud finder to anchor into solid structure rather than just drywall.
- Install your hook or strip. Follow the manufacturer’s instructions carefully. For adhesive strips, press firmly for 30 seconds and wait the full recommended time before hanging.
- Hang the piece and check level. Use your level immediately after hanging. Small adjustments are easy to make right away and nearly impossible to eyeball later.
- Step back and evaluate. View from multiple angles and distances. Natural light changes how art looks throughout the day, so check it at different times before deciding it’s final.
Safety reminder: Never hang heavy art above beds or seating using only adhesive strips. Use proper hardware anchored into studs for any piece weighing more than 10 pounds in high-traffic or sleeping areas.
For lighter pieces like acrylic wall art installation, adhesive strips are often the cleaner and more flexible solution.
Pro Tip: Use removable adhesive hooks for art you want to rotate seasonally. They come off cleanly and let you refresh your space without repainting.
If your art hangs crooked after your best efforts, try small rubber bumpers on the bottom corners of the frame. They grip the wall slightly and prevent that annoying slow tilt over time.
Personalizing and refreshing your art displays
Now that your art is up, discover how to keep your displays personal, fresh, and true to your style.
A home that truly reflects you isn’t static. Your taste evolves, your life changes, and your walls should keep pace. One of the easiest ways to keep things feeling current is to rotate art seasonally. Swap out cooler, moodier pieces in winter for brighter, more vibrant works in spring and summer. It costs nothing extra if you already own the pieces, and the effect is surprisingly powerful.
Personal touches make an enormous difference. Incorporating a commissioned portrait, a print from a local artist, or even a photograph you took yourself adds a layer of meaning that store-bought generic art simply can’t replicate. Mix those personal pieces with more graphic, colorful works for a display that tells a story.
Mixing mediums is one of the most underrated design moves. Combining canvas textures with the sleek surface of an acrylic print and the industrial warmth of colorful metal art creates a display that feels layered and intentional. The contrast between matte and glossy surfaces adds visual depth that a single medium can’t achieve.
Here are some quick personalization ideas to try:
- Swap one piece per season to shift the mood without a full redesign
- Add a corkboard or grid panel where you can pin smaller prints and photos
- Use a ledge shelf to lean art instead of hanging it, making swaps effortless
- Layer smaller pieces in front of larger ones for depth
- Mix art prints with mirrors or plants to break up the visual rhythm
If you’re curious about fresh ways to update your displays, acrylic print updates are a great starting point because they photograph beautifully and catch light in a way that canvas doesn’t.
Pro Tip: Take a photo of your wall arrangement every time you make a change. Over time, you’ll build a visual record of your evolving style, which makes future updates faster and more intentional.
Why personalization matters more than perfect design
Having explored practical steps, here’s a perspective on why personalized art is the true hallmark of a vibrant home.
Design media has spent decades telling us that symmetry equals beauty and that a